Full service email allows you to send and receive emails for your domain name without managing your own email servers.
You can have 50Gb storage and up to 100 accounts and all emails are spam filtered and anti-virus scanned. You can use our
Webmail interface
to access your emails at anytime, from anywhere.
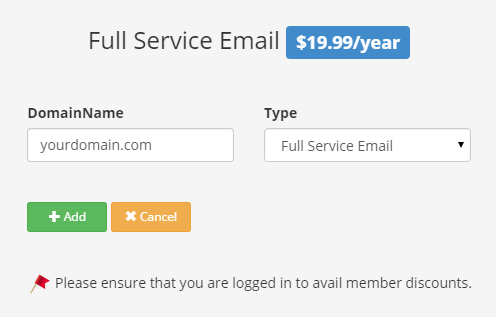
You may click here to sign up for full service email for your domain name.
Full service for your domain name won't work until you add our mail servers as the only MX records. Please log into your Dynu Control Panel and navigate to each of your full service email to obtain the MX record details. Please note that the MX records and server names will be different for different domains, so please refer to the control panel for each domain's settings.
If your DNS is managed by us, MX records should have been added automatically when you sign up for the service. Otherwise, you can refer to this tutorial to add them in the control panel.
If your DNS is managed somewhere else, you can either transfer your domain name to us or contact your current registrar to add the MX records.
 Catch-all Email Address
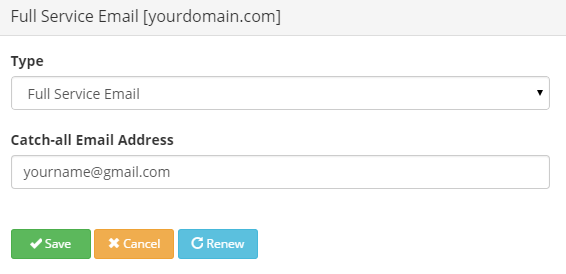
It is possible to specify an email address that receives all emails being sent to non-existent addresses on your domain. For example, you may have set up sales@yourdomain.com, contact@yourdomain.com, and info@yourdomain.com. But it is possible that someone might misspell an email address and send an email to contacts@yourdomain.com.
The solution is to specify a catch-all email address to receive all email sent to non-existent addresses on the domain. The catch-all email address can be a previously existing one, or one created for the purpose. If you want to reject any emails sent to non-existent addresses in your domain, you should not specify a catch-all address.
 Plus Addressing

Plus addressing allows you to use on-the-fly aliases for your accounts without any configuration. All characters after the plus addressing character are ignored. For example, if you go to Amazon and sign up with John+amazon@yourdomain.com then any email sent to that email address will go to John@yourdomain.com. You do not have to set up an account for John+amazon@yourdomain.com. It's handy to see who is selling your email address to spammers. If you do not have use for plus addressing you can disable it.
 Email Accounts
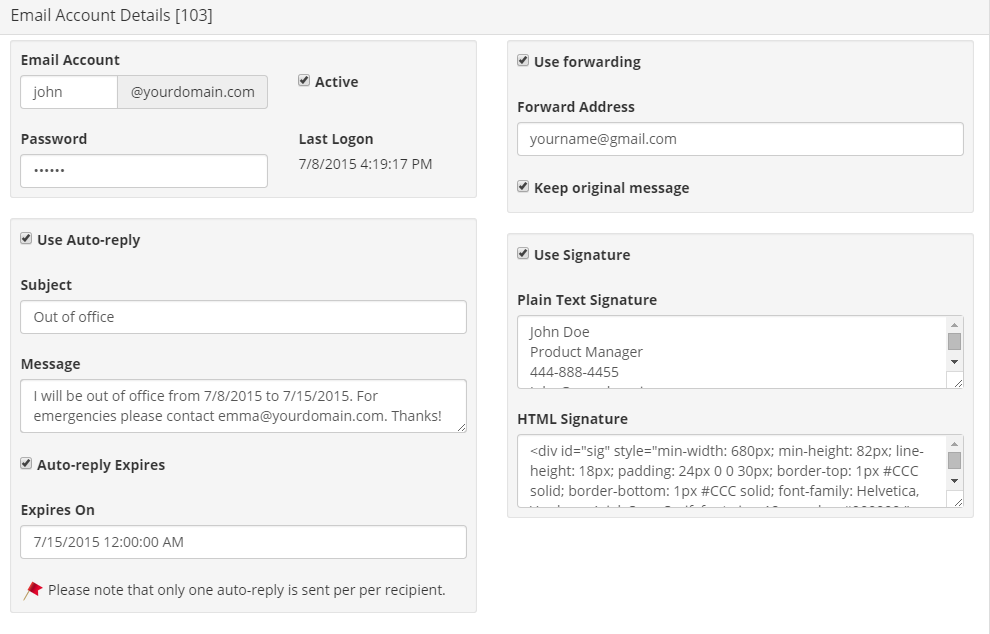
You can use set up an email account to use with any IMAP/POP email client or use our Webmail interface to access your emails.
 Aliases

Aliases are used to forward email from one specific address to another. This can be useful if you want to monitor several email addresses, but only have one real email account.
For example, you may want to receive email messages sent to info@yourdomain.com, contact@yourdomain.com, and john@yourdomain.com, but you just want to create and manage john@yourdomain.com account instead of 3 different accounts. Then info@yourdomain.com and contact@yourdomain.com can be made aliases of john@yourdomain.com. The Redirect To email can be any account, another alias or an email address on an external domain such as Gmail, Yahoo etc.
 Distribution List

The distribution list allows you to set up forwarding from one email address to multiple others. You can first save the from email address name such as recipientlist@yourdomain.com. You can then add member email addresses to the distribution list. The members are the forwardto email addresses. Note that the member email adddress will not enter the system until the verification link sent there has been clicked.
 Signature
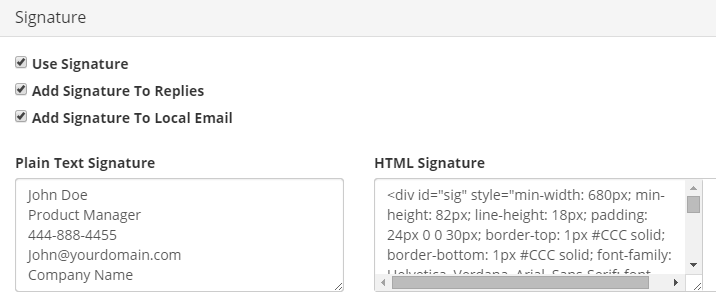
In this section, you can add a signature to all emails sent from this domain. It's possible to enter both a plain text version and an HTML version of the signature.
 Rules
Rules
Setting up rules will allow you take certain actions based on the content of the incoming emails. For example, you can set up a rule to delete all emails containing 'Spam' in the subject line or forward an email to another account if the email size is bigger than a value that you specify. You can set up rules for each of your email accounts. A rule is consisted of one or more criteria and actions. When the criteria are met, the specified actions will be taken.
Below are explainations of a list of search types:
Please log into your Dynu Control Panel and navigate to each of your full service email to obtain the SPF record details. Please note that the records and server names will be different for different domains, so please refer to the control panel for each domain's settings.
You may also use our SPF record generator to generate your SPF record. If your domain name DNS is managed by us, you may refer to this tutorial to set it up.
There are two parts of DKIM keys, the public key that goes to the DNS record of your domain name and the private key that goes to our email server. Both keys can be generated using our DKIM wizard.
Use yourdomain.com as 'Domain Name', mail as 'DomainKey Selector' and the key size should be 2048.
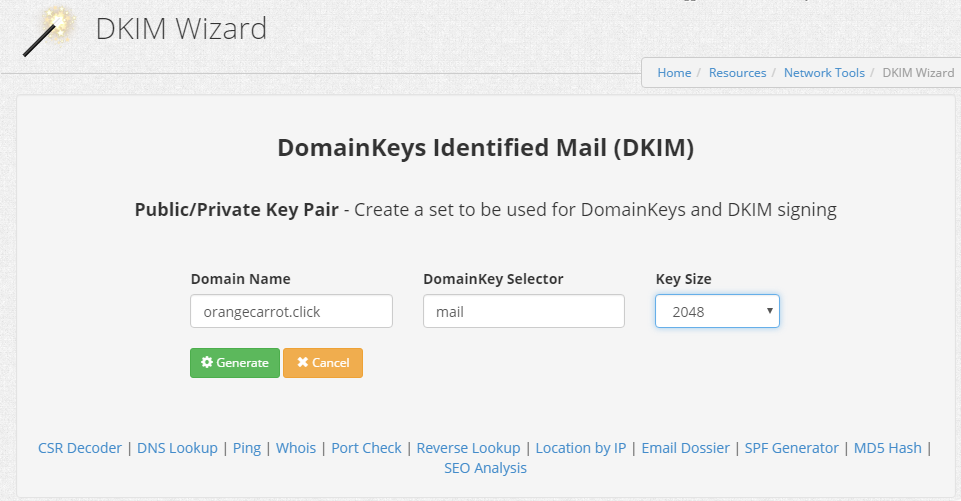
You will be asked to add a TXT record for mail._domainkey.yourdomain.com.
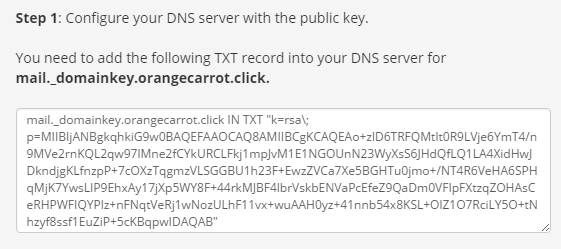
If your domain DNS is hosted with us, you may add the record in 'DNS records' section: Use mail._domainkey as 'Node', Type is 'TXT', and TTL can be set to any value from 90 to 1440. Copy the public key record to the 'Text' section as pictured.
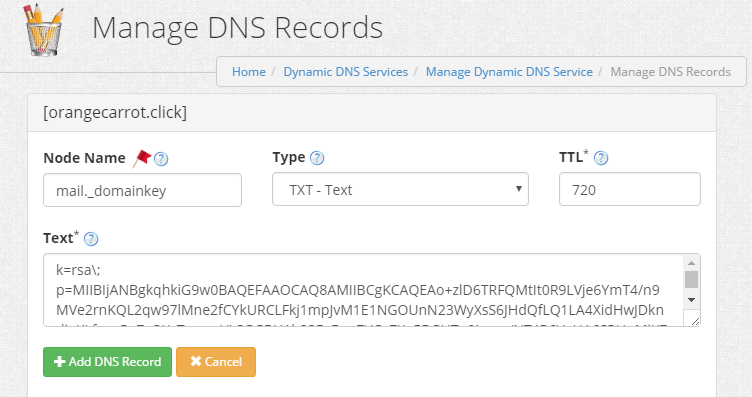
You may verify that the TXT record has been set up correctly using the DNS lookup tool. Use mail._domainkey.redtomato.click as 'Host' and the type is TXT. It may take up to 5 minutes to go into effect.
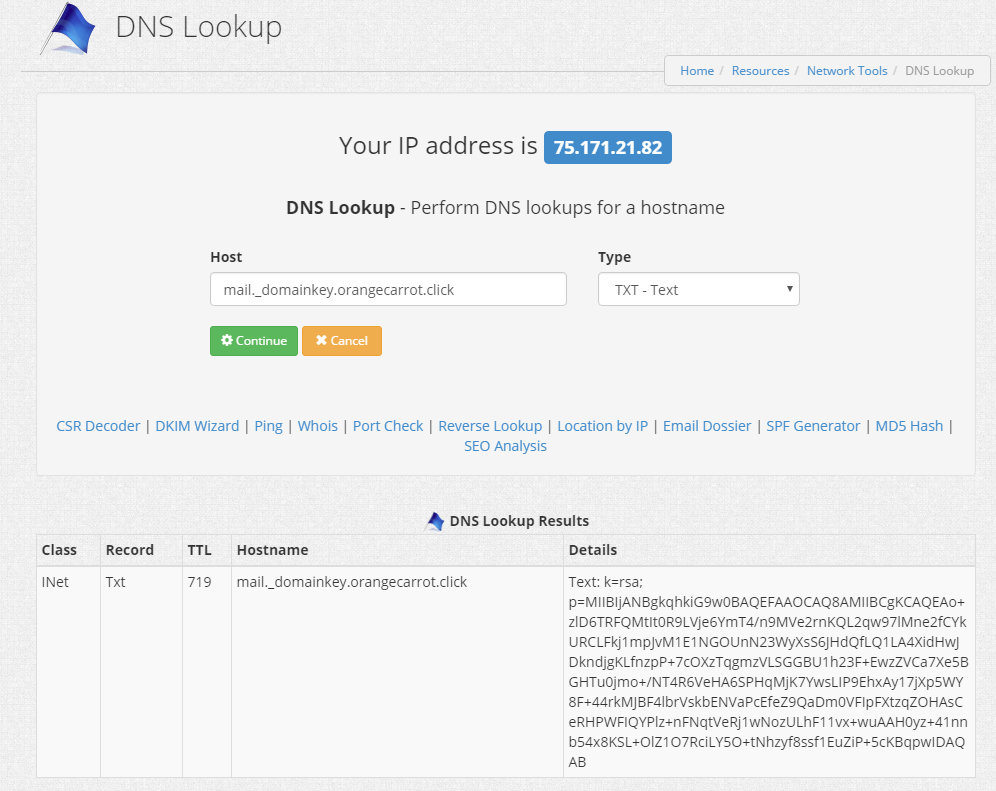
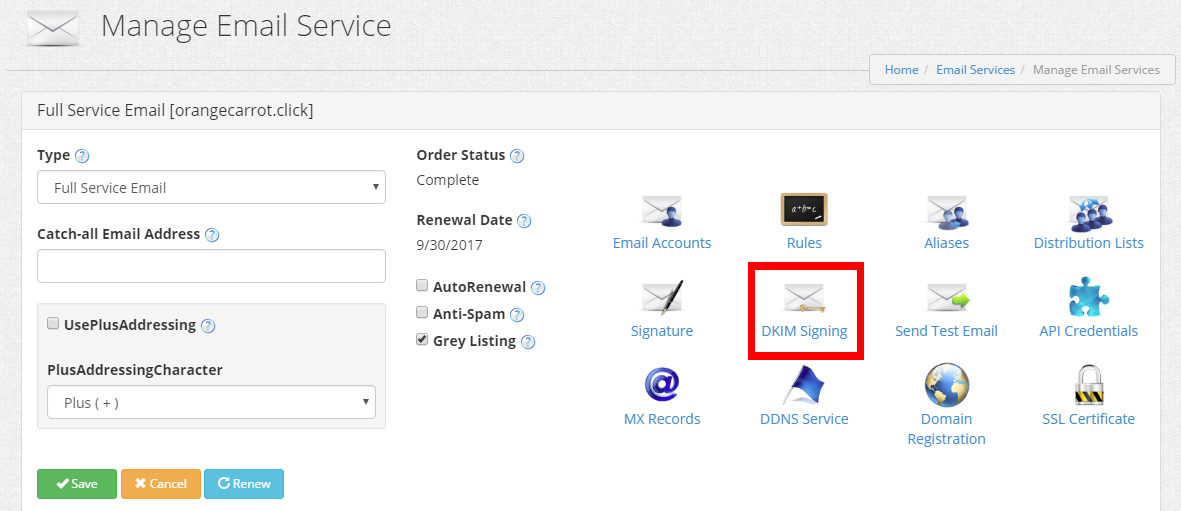
Now go to the email service setting for your domain name in the control panel. The private key will be set in 'DKIM Signing' section.
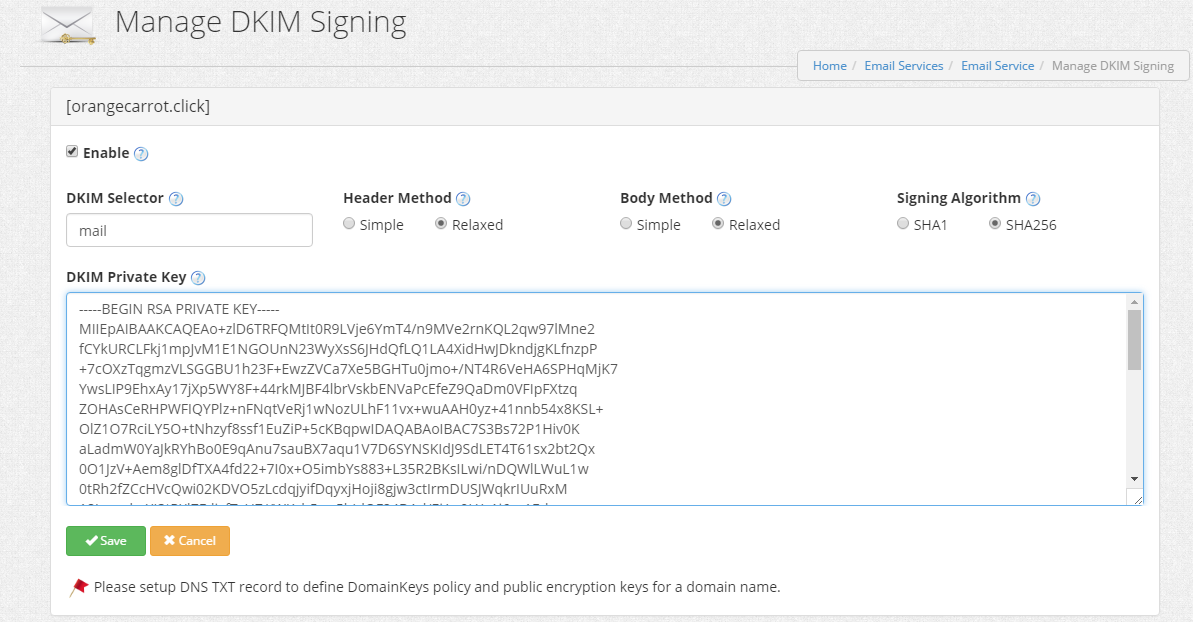
'DKIM Selector' is mail, Header Method' and 'Body Method' should be relaxed and the 'Signing Algorithm' should be SHA256. Copy the private key generated using the DKIM wizard to the 'DKIM private key' section.
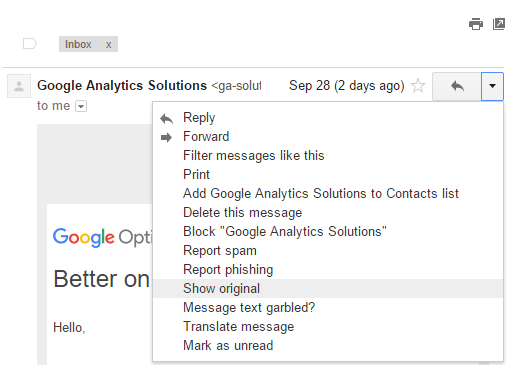
You can test SPF and DKIM sigature by sending an email from user@yourdomain.com to a Gmail address. You should be able to see that DKIM and SPF pass in viewing the original email.
A DMARC record is a TXT record published in your domain's DNS zone, under _dmarc.yourdomain.com, where “yourdomain.com” is your actual domain. It tells the email recipient what to do when an email message fails DMARC authentication, and also where to send reports of email authentication statistics. It is recommended to set up a simple DMARC record for _dmarc.yourdomain.com with the following text:
v=DMARC1; p=none;
If you'd like a more strict record or want to receive the authentication reports, you may use our DMARC generator tool to generate one.
After configuring the account, you may refer to email client configuration to check your emails with a preferred email client software.
Step 1: Sign up for full service email
You may click here to sign up for full service email for your domain name.

Step 2: Add MX record
Full service for your domain name won't work until you add our mail servers as the only MX records. Please log into your Dynu Control Panel and navigate to each of your full service email to obtain the MX record details. Please note that the MX records and server names will be different for different domains, so please refer to the control panel for each domain's settings.
If your DNS is managed by us, MX records should have been added automatically when you sign up for the service. Otherwise, you can refer to this tutorial to add them in the control panel.
If your DNS is managed somewhere else, you can either transfer your domain name to us or contact your current registrar to add the MX records.
Step 3: Email account setup

It is possible to specify an email address that receives all emails being sent to non-existent addresses on your domain. For example, you may have set up sales@yourdomain.com, contact@yourdomain.com, and info@yourdomain.com. But it is possible that someone might misspell an email address and send an email to contacts@yourdomain.com.
The solution is to specify a catch-all email address to receive all email sent to non-existent addresses on the domain. The catch-all email address can be a previously existing one, or one created for the purpose. If you want to reject any emails sent to non-existent addresses in your domain, you should not specify a catch-all address.

Plus addressing allows you to use on-the-fly aliases for your accounts without any configuration. All characters after the plus addressing character are ignored. For example, if you go to Amazon and sign up with John+amazon@yourdomain.com then any email sent to that email address will go to John@yourdomain.com. You do not have to set up an account for John+amazon@yourdomain.com. It's handy to see who is selling your email address to spammers. If you do not have use for plus addressing you can disable it.

You can use set up an email account to use with any IMAP/POP email client or use our Webmail interface to access your emails.
- Email Account: The email address of the account. The following characters are not supported in the account: ? * | \ / < >
- Password: The password of the account. Passwords are encrypted.
- Auto-reply: An Auto-reply can be used as an out-of-office notification or auto-acknowledgement for receiving an email. If auto-reply for the account is set up when someone sends you an email, they will receive your auto-reply message.
- Auto-reply expires: By setting an expiration date, the auto-reply will automatically be disabled at a given date. This is useful if you know that you will be out of office for a certain number of days. When you're back, you don't have to manually disable the auto-reply again.
- Forwarding: The forwarding functionality lets you forward email from this account to another. Check Use forwarding to start forwarding of emails. Enter the email address you want to forward emails to. If you want to forward emails without keeping copies of them, uncheck Keep original message.
- Signature: If you specify a signature, it will be appended to email messages sent from this account. You can specify both a plain text signature and an HTML signature.

Aliases are used to forward email from one specific address to another. This can be useful if you want to monitor several email addresses, but only have one real email account.
For example, you may want to receive email messages sent to info@yourdomain.com, contact@yourdomain.com, and john@yourdomain.com, but you just want to create and manage john@yourdomain.com account instead of 3 different accounts. Then info@yourdomain.com and contact@yourdomain.com can be made aliases of john@yourdomain.com. The Redirect To email can be any account, another alias or an email address on an external domain such as Gmail, Yahoo etc.

The distribution list allows you to set up forwarding from one email address to multiple others. You can first save the from email address name such as recipientlist@yourdomain.com. You can then add member email addresses to the distribution list. The members are the forwardto email addresses. Note that the member email adddress will not enter the system until the verification link sent there has been clicked.

In this section, you can add a signature to all emails sent from this domain. It's possible to enter both a plain text version and an HTML version of the signature.
- Use signature: If you select this option, the specified signature will be appended to all emails sent from this domain name.
- Add signatures to replies: If this option has been selected, signatures will be added to replies. Note that this option affects all emails sent within the domain.
- Add signatures to local email: If this option is checked, signatures will be added to local emails. An email is considered local if both the sender and all the recipients exist in the same domain. Note that this option also affects all email sent within the domain.
Setting up rules will allow you take certain actions based on the content of the incoming emails. For example, you can set up a rule to delete all emails containing 'Spam' in the subject line or forward an email to another account if the email size is bigger than a value that you specify. You can set up rules for each of your email accounts. A rule is consisted of one or more criteria and actions. When the criteria are met, the specified actions will be taken.
Below are explainations of a list of search types:
- Is: Used to specify an exact match.
- Contains: Used to specify a partial match. For example, if you want to delete all emails containing the word 'spam' in the subject line, you can use this search type.
- Less than: Used for numeric matches. For example, you can use this search type if you want to take certain action for emails whose size are smaller than 10 MB.
- Larger than: Used for numeric matches. Opposite of Less than.
- Regular expression: Regular expressions allow you to more complexed matching types. For example, if you want to apply a rule to emails where the subject line has numbers and letters. You may visit here for more information about regular expressions. Please note that this matching type must be exact match, it is not possbile to use partial matching.
- Delete email: Delete the email from server.
- Forward email: Forward email to another email account.
- Reply: Auto-reply to an email
- Run function: Run a script whenever the criteria are met.
- Set header value: Add MIME-headers to email message.
- Moving to IMAP folder: Move emails to an IMAP folder or sub-folder(Folder.Subfolder1.Subfolder2).
- Stop rule processing: If you choose this option, any action or rule specified after this will not be executed.
Step 4: Set up SPF record
Please log into your Dynu Control Panel and navigate to each of your full service email to obtain the SPF record details. Please note that the records and server names will be different for different domains, so please refer to the control panel for each domain's settings.
You may also use our SPF record generator to generate your SPF record. If your domain name DNS is managed by us, you may refer to this tutorial to set it up.
Step 5: Set up DKIM keys
There are two parts of DKIM keys, the public key that goes to the DNS record of your domain name and the private key that goes to our email server. Both keys can be generated using our DKIM wizard.
Use yourdomain.com as 'Domain Name', mail as 'DomainKey Selector' and the key size should be 2048.

You will be asked to add a TXT record for mail._domainkey.yourdomain.com.

If your domain DNS is hosted with us, you may add the record in 'DNS records' section: Use mail._domainkey as 'Node', Type is 'TXT', and TTL can be set to any value from 90 to 1440. Copy the public key record to the 'Text' section as pictured.

You may verify that the TXT record has been set up correctly using the DNS lookup tool. Use mail._domainkey.redtomato.click as 'Host' and the type is TXT. It may take up to 5 minutes to go into effect.

Now go to the email service setting for your domain name in the control panel. The private key will be set in 'DKIM Signing' section.

'DKIM Selector' is mail, Header Method' and 'Body Method' should be relaxed and the 'Signing Algorithm' should be SHA256. Copy the private key generated using the DKIM wizard to the 'DKIM private key' section.

You can test SPF and DKIM sigature by sending an email from user@yourdomain.com to a Gmail address. You should be able to see that DKIM and SPF pass in viewing the original email.

Step 6: Set up DMARC record
A DMARC record is a TXT record published in your domain's DNS zone, under _dmarc.yourdomain.com, where “yourdomain.com” is your actual domain. It tells the email recipient what to do when an email message fails DMARC authentication, and also where to send reports of email authentication statistics. It is recommended to set up a simple DMARC record for _dmarc.yourdomain.com with the following text:
v=DMARC1; p=none;
If you'd like a more strict record or want to receive the authentication reports, you may use our DMARC generator tool to generate one.
After configuring the account, you may refer to email client configuration to check your emails with a preferred email client software.
